Cast #121 - Aluminum Field Ant Colony Casting
 | Ant Type: Field Ants (Formica pallidefulva)
Cast Number: #121
Created: 8/5/2022
Cast Weight: 10 lb
Cast Material: Aluminum
Cast Dimensions: 20"x9"x12" (HxWxL)
Stand Wood: Oak/Poplar
Mount: Various (See Description Below)
Orientation: Right Side Up
| |
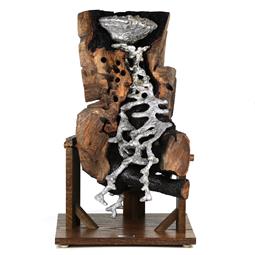
This was probably the most difficult cast I’ve attempted and I don’t think I would have done it if I didn’t have a fairly large following on YouTube. I didn’t intend to keep it in the wood until the end, once it became obvious that the entire cast was basically contained in the section of wood I had cut out. It’s really a unique piece. I’m glad I kept it in the wood because otherwise it would just be a standard cast that was 10x harder than one that wasn’t on a stump. From the pour to getting it out of the ground was 10 days and about 40 hours of work.
In cutting the cast out, I used a method where I would drill down into the wood and make sure there were no dirt pockets. These ants don’t dig tunnels in the wood so all of the cast will in the dirt between the wood. So if I didn’t hit dirt with the drill, I could be fairly sure I wouldn’t be cutting into the cast.
Since I wasn’t planning to keep the cast in the wood initially, I wasn’t being very careful with the wood. I tried plugging some of the drill holes and really didn’t like how that looked, so I decided to just keep it basically as it was when I freed it from the ground. I did sand and remove any splintered type wood as best as I could. I also was worried about the bark falling off long term so I coated just the bark in epoxy.
The stump was about 8-10 months old when I poured, so the wood was still fairly fresh. I’m not sure what’s going to happen to it as the wood starts to dry. I did treat it with Pentacryl which is supposed to help prevent cracking in drying wood. I plan to keep the cast myself just to make sure it’s not going to crack too bad when it dries.
The stand was made by first drilling three holes in the cast and inserting 3/4” oak dowels. Then I built a base with three vertical boards with semi-circular notches cut out. The dowels in the stump wood sit catch in the notches and allow it to sit upright on the base. Then, for extra stability, a cover is screwed on top of the dowels. You can see the mount details in
this picture.
The base wood is oak, except for the diagonals which are poplar. The base is stained with a medium brown stain and finished with satin polyurethane.